Sunday, July 27, 2008

July 25th, Back porch all roofed and papered


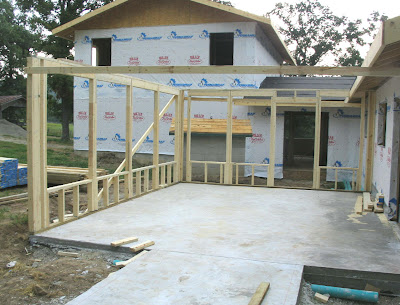
Here is roof of the back porch all decked and tar papered, ready for shingles. Denis took this picture from a window in the room above the garage. This is a picture of the back porch, taken from what will be the doorway into the mud room. There will be a walkway from the mud room to the back porch. It will not be covered.

Here's a view of the porch from the north, to show how it fits to the house and in reference to the garage and well house.

Denis told me he had a surprise for me, regarding the house and wanted me to guess. I couldn't do it until I looked at the pictures he had taken and he gave me a hint. The suprise is that we are going to tear down the old well house, move the pressure tank to the utility room and just have a manhole cover over the well itself. That will be a big improvement, to have that little house out of the way. It was put in crooked anyway and that has always bugged us. This may be the last picture you see of it.

July 24th, Framing and roofing the back porch


The Sky Trak machine is moving some more trusses into place for the back porch roof. That machine is really handy. They also used it to lift the three slates for the pool table up to the room above the garage.


Rick is pushing the truss into place while Randy is ready to nail it in.

Randy and Tim are securing the roof trusses to the existing structure. Note that Denis (not me) had to be on the roof to take this picture. I know there are some other people looking at this that would not have been able to do that.


The back porch is taking shape now. The other lumber is for the gazebo.

Decking has been placed over the roof trusses on the back porch.

July 22nd, Framing the back porch

I was out of town when the back porch was getting framed in, so I'm catching up on posting pictures.

It will be totally screened, so the builder wanted to come up with a good way to do that, using 4 foot removable type screens. Here is his first idea with basically a header at the top of the wall and a footer at the bottom. Luckily Denis was here and nixed that idea as soon as he saw it. That would have cut off too much light and the view out of the porch.


Here is the AFTER picture, with the top header removed. The footer is there to keep dogs, or other critters from tearing into the screens too easily. It may still happen but not at ground level.


This is a view into the porch area, from where the walkway to the gazebo.

Friday, July 18, 2008

July 18th, Concrete poured, half bath framed

Concrete was poured today for the patio and gazebo. Denis is wetting it down for the "slow cure".


Wetted down like this is kind of looks like a little pool. By the end of this hot day I was wishing it was a pool of cool water.


Upstairs in the pool room (the game, nothing to do with water), the half bath got framed in.


The old carpet and subfloor got torn out of the living room. Here is the result, to be hauled off to the burn pile tomorrow.


Thursday, July 17, 2008

July 17th, Inside framing and patio/gazebo framed in and rocked

Framed in pantry, master bedroom walkin closet behind.


Master bedroom closet to left, mudroom, linen closets.


Edge of patio, walkway to gazebo and gazebo base framed in and rocked, viewed from the east.


Looking from the west, gazebo base, walkway, patio base, and all new construction, wrapped up.


Patio on the north side of the house. French doors will open onto it, and it will be roofed and screened.

Garage is all wrapped up like a Christmas present.

July 16th, Inside framing


From kitchen, looking toward bedroom windows. This is the future site of the pantry and master bedroom closet.

Inside master bedroom, looking at framed in shower on the right, commode room on the left. Door of the commode room is facing the camera. It will be moved in the next picture. The view is into the garage.

We decided to move the door so it didn't conflict with the door from the mud room into the bathroom. Now there is wall framing where the door was and the door is on the east wall instead of the south wall. Thanks Rick for the idea and Randy for the work.


This is a view directly into the master shower.


July 15th, Roof is tar papered, house is wrapped

Vince started early this day and got the tar paper on the roof.


The other guys were busy with other things, like wrapping the house and garage.


Garage entrance, wrapping started.


July 14th, Roofing started

4:42 Vince starts decking the roof.

6:52 Vince is working by himself, but moving fast.


This is The Sky Trac machine for moving heavy objects up to the roof. It also acts as a forklift.


Monday, July 14, 2008

July 13th, New roof over old roof

To accommodate the additional 12 feet added on to the house, the roof line had to be raised so it could extend the proper distance. Here you can see the addition and the roof laying over the old part and the new part.


The next two pictures show in more detail how the new roof trusses are joined to the old ones. I'm glad the builder was smart enough to figure out how to do this.


July 11th, Pool room


The room above the garage is our "pool room". No, not a swimming pool but a room for a pool table. Denis has one that belonged to his father and he has been moving in around, in pieces, for about 30 years now. We'll have to refinish it before setting it up in this nice big room. This picture is looking to the east.


This picture is looking west toward the stairway.


This view is looking south out of a window in the pool room.


This picture is looking down from the pool room at the new kitchen area. The well house is down below.


Thursday, July 10, 2008

July 9th, Trusses everywhere!


The trusses are in place for the new roof over the extended part of the house.


The roof trusses are on the garage. It looks odd because the windows haven't been cut out yet.


This is a view of the garage entrace, which is on the east. you can see the trusses over the old roof too.


The big yellow looking beam is where the old north wall of our bedroom was. You can kind of see how the roof trusses extend over the old roof and create a new roof over the extension.


Close up view of the roof trusses.


July 8th, Raising the big trusses up high

Sure is a huge crane for our little job.


The crane is doing its job, lifting the first truss into place on the garage roof.

Easy does it.

Guide it into place, carefully.

Denis is observing, with amazement I'm sure.

Finally it's straight, and in the right place -- a delicate operation.


Randy says to lower it down another inch.


Nail it into place, Randy. Quick!!


Here's the truck part of the crane. Look at the stabilizing bars that hold it in place. What a day of excitement this has been!